Essential Linux Skills: Users, Groups & Permissions. Oh My!
- Janice Sanders
- Nov 20, 2023
- 4 min read

Linux systems are ubiquitous. As a Cloud or DevOps Engineer, managing Linux systems is essential, especially considering that over 80% of cloud infrastructure is reported to run on Linux or Linux-based systems.
Organizations can boost operations by implementing secure and efficient user management with Linux. By managing users at a scale and ensuring those users only have access to their relevant data and systems, this approach enhances security and minimizes breaches. Utilizing Linux commands and bash scripting plays a significant role in achieving this efficiency and security.
This guide provides a walkthrough of essential Linux tasks, focusing on managing users and groups — and setting permissions, which are fundamental for effective Linux system management.
🏴Prerequisites: 🔸Linux Command Basics: Know how to navigate directories and handle files in Linux. 🔸User/Group Management: Understand the basics of managing users and groups in Linux. 🔸File Permission Basics: Be familiar with modifying file permissions in Linux. 🔸Scripting Fundamentals: Have a basic grasp of scripting, particularly in Linux. 🔸Problem-Solving: Possess skills in researching and troubleshooting.
🪜Here are the steps we’ll take: 1️⃣Create Directories as Root User 2️⃣Add Files to Each Directory 3️⃣Create User Groups 4️⃣Change Ownership of Each Directory 5️⃣Set Permissions 6️⃣Create Users and Associate User Information 7️⃣Verify User Access 8️⃣Modify User Profile Permissions and Verify Access 9️⃣Create a Bash Script to Manage Users, Groups, and Permissions
Let’s navigate the use of some practical Linux skills together!
1️⃣Create Directories as Root User
In the terminal, enter the following command to create the three directories: Development, Operations, and Analytics.
sudo mkdir Development Operations Analytics
2️⃣Add Files to Each Directory
Navigate to each directory:
cd [directory_name]cd [directory-name] Create blank files in each directory, respectively:
touch [filename1 filename2 filename3] ⛔️Common Error: “Permission denied” error is a common issue due to unauthorized access to files or directories. Users will encounter this error when they try to access a file or directory for which they do not have the necessary permissions. Since these directories were created as Root User, the sudocommand is required to create files within them.

3️⃣Create User Groups
Run the following commands, separately, to create the three groups — Developers, Operations, Data Analysts:
sudo groupadd Developerssudo groupapp Operationssudo groupadd Data_Analysts⛔️Common Error: Linux does not support spaces in the group name. Group names should be a single word, and you can use a hyphen (-) or an underscore (_) to replace the space.

You can verify the groups by running the following command:
cat /etc/group

4️⃣Change Ownership of Each Directory
Now, we’ll change the owner of each directory to their respective group.
🔸Directories: Development, Operations, Analytics
🔸Groups: Developers, Operations, Data_Analysts
This command changes the group ownership of the Development, Operations, and Analytics directories for the Developers, Operations, and Data_Analysts groups, respectively.
sudo chown :Developers Developmentsudo chown :Operations Operationssudo chown :Data_Analysts Analytics
5️⃣Set permissions:
The following commands set full read, write, and execute permissions for the owner and group, but no permissions for others.
sudo chmod 770 Developmentsudo chmod 770 Operationssudo chmod 770 Analytics
6️⃣Create Users and Associate User Information
Next, we’ll create the following users and assign them to groups:
✅Jess Waller, username= jwaller, email=jwaller@levelupbank.com, group= Developers
✅Blake Dorsey, username= bdorsey, email=bdorsey@levelupbank.com, group= Operations
✅Joey Ewart, username= jewart, email=jewart@levelupbank.com, group= Data_Analysts
Run the following commands to perform this operation (as one single script per code block):
sudo useradd -m -g Developers -s /bin/bash -c "Jess Waller <jwaller@levelupbank.com>" jwallersudo useradd -m -g Operations -s /bin/bash -c "Blake Dorsey <bdorsey@levelupbank.com>" bdorseysudo useradd -m -g Data_Analysts -s /bin/bash -c "Joey Ewart <jewart@levelupbank.com>" jewart
7️⃣Verify User Access
Switch to each user using the following command to access each directory and verify access permissions:
su - [username]Each user should have permissions to view and open the files in the directory.

⛔️Common Error: If a user account is created without setting a password, it is usually locked by default. This means you cannot log in as that user until a password is set. Attempting to switch to such a user using the su command will result in an “Authentication failure” since there is no password to authenticate against. Set the user passwords using the following command to gain permissions to login as the respective users:
sudo passwd [username]
Retry switching to each user using the following command to access each directory and verify access permissions:
su - [username]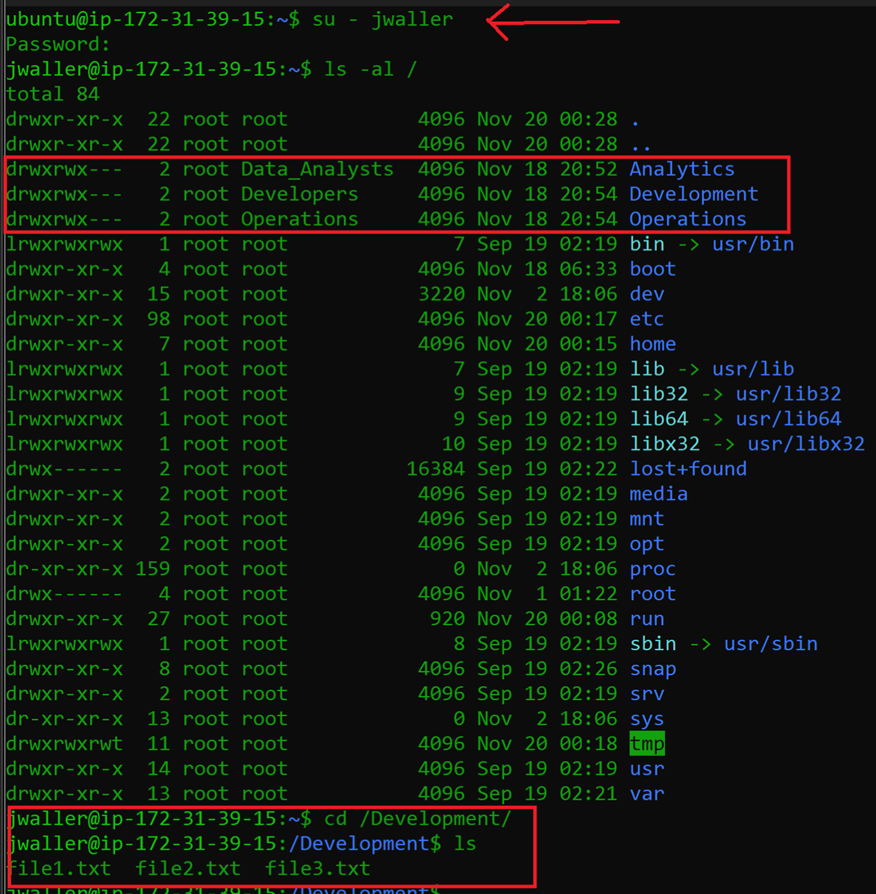

⛔️Common Error: If you find that you cannot access the Directory for the user’s associated group, you may need to move directories to a location that is accessible by the user. In this case, I moved the directories to the (/) root of the system.

8️⃣Modify User Profile Permissions and Verify Access
Run the following command to restrict access to the user’s home directory:
sudo chmod 700 /home/[username]Note: Be sure to use sudo for elevated privileges or you will receive "Operation not permitted".

Next, verify each user’s profile access. Log in as each user to validate permission restrictions for other users.


Note: We see that each user is only permitted to access their own home directory.
The following section demonstrates how to use a bash script to perform the same tasks as the above previous steps.
9️⃣Create a Bash Script to Manage Users, Groups, and Permissions
🔸To perform the previous tasks, a bash script can be used. We’ll use vim to create our script — and name it ‘user_group_setup.sh’:
vim user_group_setup.sh
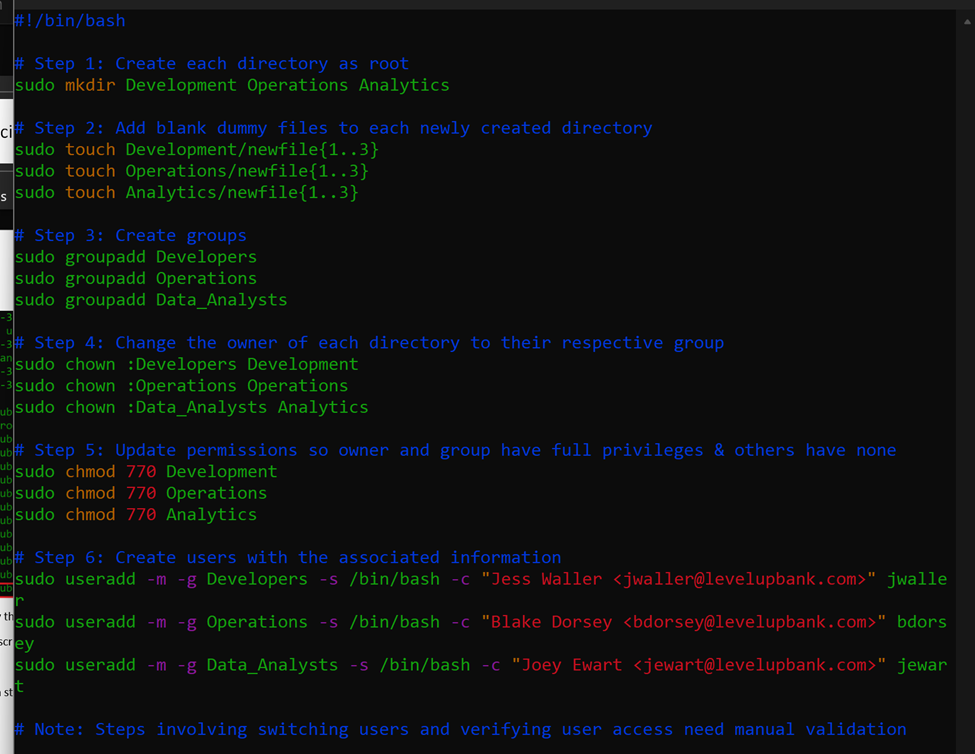
Note: The following script is the same as what is shown above.
#!/bin/bash

# Step 1: Create directories
sudo mkdir Development Operations Analytics

# Step 2: Add files to each directory
sudo touch Development/dev_file{1..3}
sudo touch Operations/ops_file{1..3}
sudo touch Analytics/analytics_file{1..3}

# Step 3: Create groups
sudo groupadd Developers
sudo groupadd Operations
sudo groupadd Data_Analysts

# Step 4: Change the owner of each directory to their respective group
sudo chown :Developers Development
sudo chown :Operations Operations
sudo chown :Data_Analysts Analytics

# Step 5: Modify permissions
sudo chmod 770 Development
sudo chmod 770 Operations
sudo chmod 770 Analytics

# Step 6: Create users
sudo useradd -m -g Developers -s /bin/bash -c "Jess Waller <jwaller@levelupbank.com>" jwaller

sudo useradd -m -g Operations -s /bin/bash -c "Blake Dorsey <bdorsey@levelupbank.com>" bdorsey

sudo useradd -m -g Data_Analysts -s /bin/bash -c "Joey Ewart <jewart@levelupbank.com>" jewart
🔸Make the script executable: chmod +x user_group_setup.sh

🔸Run and verify the script using the following command:
./user_group_setup.sh
Upon running the script, we can see that the groups and users already exist, as the notification indicates. However, the script seems to be working as intended.
And there we have it — that’s the power of Linux commands in action. It gives us the ability to take complex tasks and turn them into scalable and streamlined processes for efficiency and security.
It’s a win! 👏👏
To receive my latest projects, playbooks, and posts, follow my Medium page, and Subscribe to get email notifications when I post new stories.
🔗For a more personal connection, connect with me on LinkedIn to network and grow together.
Comentários